Installation Instructions For Model AD-1 Auto-Draft Inducer
Note
This is an overview of installation procedure. Please consult the manual shipped with your fan for complete installation and safety information.
Wood Selection
CAUTION: GREEN OR RESINOUS WOODS MUST NOT BE BURNED IN ANY DOMESTIC WOOD BURNING STOVE BECAUSE OF THE POTENTIAL HAZARD OF CHIMNEY FIRES.
WARNING
The burning of such woods as pine, fir, etc. produces a tar-like substance known as creosote which can coat the interior of the chimney and Draft Inducer. Stack temperature may become high enough to ignite the deposits and cause a chimney fire.
Similarly, caution must be exercised when artificial or paper roll logs are burned because of the large volumes of flue gas and smoke produced. If artificial logs must be used, burn only one or two at a time to determine whether or not the smoke output exceeds your stove's venting capacity.
Installation Restrictions
The Auto-Draft needs to pull adequate air through the stove to run properly. Make sure your stove has some type of air shutter door or air intakes to satisfy draft.
The Auto-Draft requires a straight section of single wall stove pipe for installation. You must maintain an 18" clearance from combustibles to the AD-1 housing. Refer to NFPA #211 for further information.
Allow for a 1 to 2 foot distance between the AD-1 and the stove when mounting. Temperature around the electrical box and motor must not exceed 104° F. Speed control or motor damage may result from radiant heat if mounted too close to stove.
NOTE: The fan should run constantly if smoke is coming out of motor cooling hole during stove operation.
Failure to follow these guidelines could result in severe personal injury and equipment damage.

Simple Installation and Mounting
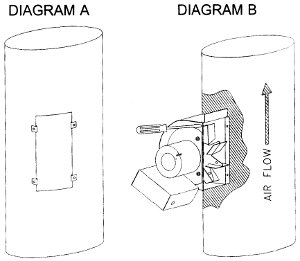
The Auto-Draft may be mounted on horizontal, vertical or inclined vent pipes. Installation on horizontal vent pipes must be made on the underside of the pipe to prevent excessive heat build up within the fan housing. Using the enclosed template, drill (4) 7/32" holes for speed nuts and cut a rectangular hole for the Auto-Draft, (See Diagram A). Insert curved edge of the fan housing into the pipe in direction of airflow and secure to pipe with screws, (See Diagram B)
CAUTION: Allow for a 1 to 2 foot distance between the Auto-Draft and the stove when mounting. Speed control or motor damage may result from heat if mounted too close to stove.

Wiring
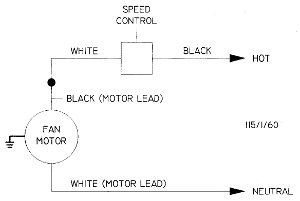
Electrical power from a grounded 120/1/60 source is required for the Auto-Draft. All wiring must be done in accordance with the National Electric Code (NEC) and applicable local codes. Extreme caution must be exercised to ensure that the radiant and convective heat generated by the stove and vent pipe does not damage the electrical wiring.
Operation
Prior to lighting the wood in your stove, the Auto-Draft should be turned on with the speed control adjusted to the "H" position. After the draft is established in the smoke pipe, the fire may be lit and the speed control may now be adjusted to a lower setting.
Maintenance
The Auto-Draft will continue to efficiently produce draft in your wood stove as long as the following maintenance is performed at suggested intervals. Depending upon the type of wood burned, the fan must be removed from the vent pipe and cleaned at least once per year. Soot and creosote build up must be removed from both the fan wheel and housing. The fan motor is permanently sealed and requires no oiling.
Note: this is an overview of installation procedure. Please consult the manual shipped with your fan for complete installation and safety information.
DIY Center
(AKA ‘The Rockford Files’)
From video tutorials to product walkthroughs, we have a variety of DIY resources just for you! Click the button below to view our entire library.


