Fireplace & Flue Interactive Diagram
Welcome to our Fireplace & Flue Interactive Diagram! Explore the heartwarming world of fireplaces and chimneys as you navigate through an interactive visual guide. Uncover the fascinating components that make these cozy focal points functional and safe. Whether you're a homeowner or a curious enthusiast, this interactive experience will kindle your interest in the captivating mechanics of fireplaces and flues.
Let's embark on a journey of warmth and knowledge together!
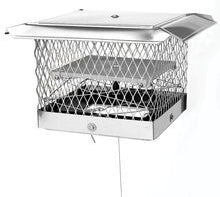
Top Damper
Chimney top dampers are mounted to the top of the chimney, replacing the need for a traditional throat damper. These top dampers are available with or without screened rain caps that provide extra protection when the damper is left in the open position. Top dampers also prevent unwanted air drafts down the chimney, and keep warm air from escaping when the chimney is not in use.
Put a Top Damper on the Top of Your To Do List
How to Install a Lock Top Chimney Damper (Video)
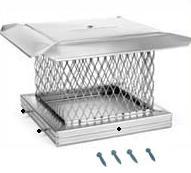
Chimney Rain Cap
A proper cap is essential for your chimney. Defective or missing rain caps can allow debris, leaves, moisture and animals and birds to enter the chimney, not to mention unwanted down-drafts into your house. Our stainless steel and copper caps have a lifetime warranty against rust and corrosion. Custom size caps are available in a variety of styles for your chimney or chase.
DIY Advantages of Chimney Caps
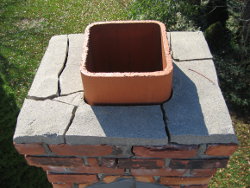
Crown (or Cap, Wash, or Splay)
The chimney crown caps off the upper end of a chimney and is usually formed from cement, with a small gap around the clay tile (if installed) for expansion. The cement crown shields the chimney's structural elements from weather-related deterioration, and slopes away from the flue to divert water intrusion.
Since the crown is exposed to the elements, it typically cracks and breaks apart, so it is vital that any defects are corrected immediately. Water penetration and freezing weather can weaken the structure in one winter. There are several repair products that do a great job to restore these areas, if detected early enough. Also, many homeowners are using chase covers to prevent this from happing or reoccurring, which are easily installed.
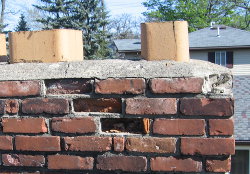
Chimney (or Chase)
A structure made of masonry or metal, that usually surrounds and supports the flue for venting hot flue gases or smoke from a fireplace, furnace, stove or insert to the outside atmosphere. Chimneys are typically vertical, to ensure that the gases flow smoothly.
The most common problem with masonry chimneys is water penetration. Loose or missing bricks and chimney deterioration can be an indication of a major problem. Brick spalling is when a brick starts to break away and deteriorate due to water seeping in the porous bricks and expanding during a freeze. An easy and inexpensive way to prevent spalling is to coat the bricks with a water repellent. In many cases, minor repairs done early will prevent huge repair bills later.
A chase is a wooden enclosure for a chimney, and has factory insulated pipe installed.
Flue
The flue is the path for hot gases and combustion products to travel up through and out of the chimney. Masonry chimneys commonly have clay flue liner tiles, or the brick may be unlined.
A flue liner in a masonry chimney is intended to contain combustion products, direct them to the outside atmosphere, and protect the chimney walls from heat and deterioration. A liner must also protect nearby combustible materials such as framing, walls, ceilings, from the heat and smoke. Safe, serviceable liners must remain free of perforations, cracks or damage of any kind that could allow carbon monoxide to pass into the living spaces of the home.
Building codes now require flues and liners to be crack free with no mortar deterioration. Unlined flues or clay tile flues with cracks or missing mortar joints do not meet current codes, and have a greater possibility of carbon monoxide leakage into the home and a higher risk of damage from a chimney fire. Relining the chimney with a stainless steel liner is an economical alternative to repairing or replacing bricks or flue tiles. Insulation can also be added during the relining process to protect combustibles from the heat of the chimney.
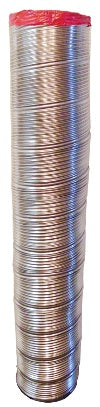
Stainless Steel Chimney Liner
Do you need a stainless steel chimney liner? If your existing flue is cracked or damaged, a stainless steel liner can be an economical alternative to destroying your old chimney or costly chimney repairs. Once installed, the stainless liner becomes your new flue.
Flexible stainless liners are round, and can be reshaped to oval, square or rectangle, to fit most all applications. When installed in a brick chimney they will follow the path of the flue through turns or offsets. Both corrugated and smooth wall flexible liners are availabe; smooth wall is more flexible and will have a 20% better draft.
Rigid stainless steel pipe can be used for relining masonry chimneys that are straight, with no offsets. They also offer a better draft, having a smooth interior.
You can install your new liner yourself:
Insulation
Material inserted between the stainless liner and chimney wall to keep the flue gases warmer inside the liner. The insulation can be a blanket wrap kit or a pour down mixture that includes vermiculite. To maintain UL Listing 1777, 1/2" of insulation between the masonry and the liner provides for zero clearance between the exterior of the chimney and combustible materials. 1/2" insulation kits will add about 1.5" to the diameter of the liner. The pour down mixture is usually used where there is less clearance.
Insulation is not required, but is highly recommended. Keeping the flue gases warmer creates a better draft for greater efficiency. Preventing flue gases from cooling inside the chimney helps stop the creosote buildup that can lead to chimney fires, which can reach up to 2,100 degrees.
Chimney Breast (or Face)
The area located above the fire box opening on the front wall of a masonry fireplace. This is an area where any smoke spillage collects and turns the brick black with soot.
Chimney Saver Paint "N" Peel Fireplace Cleaner removes soot from areas surrounding the fireplace.
Throat Damper
Located just above the firebox, these cast iron plates are used for sealing the flue shut when the fireplace is not in use to help control the air flow. The mating surfaces are rough, preventing them from sealing fully, and allowing cold air to leak. Over time, the plates rust and deteriorate as they are exposed to heat and moisture. When this happens they lose almost the entire flue sealing capacity. Due to this, a Top Damper is typically recommended for wood burning.
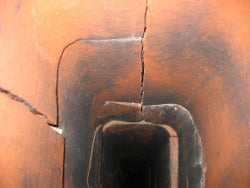
Smoke Chamber
Although factory-built fireplaces usually do not have a smoke shelf or smoke chamber, they are a standard part of most masonry fireplaces.
The purpose of the smoke chamber is to take the exhaust gases from the large firebox and compress them into a smaller chimney flue without causing a back draft. The use of sloping walls will help promote this, and will accelerate the exhaust gases into the chimney flue and help contribute to a good draft. The walls of the smoke chamber should be as smooth as possible. Brick edges jutting out into the smoke chamber may contribute to draft problems.
If creosote is not cleaned from this area, it has the potential to start a chimney fire, because of its proximity to the fire in the firebox. Because the smoke chamber is the area between the damper and the flue, the only way to access it for cleaning is through the firebox.
Smoke Shelf
The smoke shelf is usually flat, and located just below the smoke chamber and behind the chimney damper. It collects falling debris and rain water, and helps with the transition of smoke into the smaller flue.
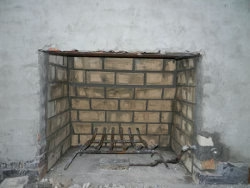
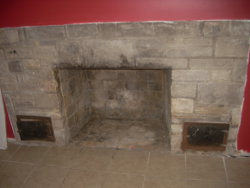
Firebox
A chamber that contains the fire and the firebox is lined with individual firebrick or firebrick panels. The firebox takes the brunt of the fire's heat and should be inspected periodically for cracks. These cracks can develop during the constant expansion and contraction and from abuse when throwing logs in. Any crack wider than 3/32" should be sealed with refractory cement. Firebricks can be purchased individually, or panels can be purchased and cut to size. Joints must also be kept in good condition with a high temperature refractory cement to ensure the fire is contained.
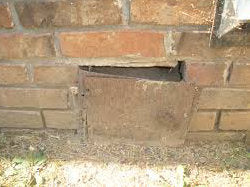
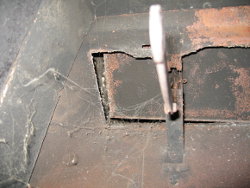
Clean Out Door
This door needs replacing!
Probably the most forgotten, part of the chimney, is the Clean Out Door, and yet it is important for functionality and safety. As the name implies, this is where the chimney is cleaned of ashes and debris. The door should be accessible, and seal properly when shut; if not, there could be a draft problem.
The cleanout area is great place to perform inspections and diagnose the condition of the chimney. Just by looking up with a mirror or camera, if the flue is straight, you should see daylight. If not, there may be a blockage in the chimney. Finding brick fragments could indicate the flue might be deteriorating. Water accumulation can mean the cap is not properly installed or missing. Staining may also be present from rust or creosote.